Quantcast
Channel: ASP.NET – Xlinesoft Blog
Viewing all 88 articles
Browse latest View live

Using DAL functions in projects with multiple database connections

$
0
0

PHPRunner 8, ASPRunnerPro 9 and ASPRunner.NET 8 added an option to use multiple database connections in single project. This article explains how you can access data from multiple databases in your events.

Method 1: using DAL functions

PHPRunner

We now have three options to refer to a table

1. $dal->Table("table")

finds first matching table by it's name in all connections, starting with the primary connection.

2. $dal->Table("table","schema")

schema name helps to identify tables with identical names located in different schemas in databases like Oracle, Postgre and SQL Server.

3. $dal->Table("table","schema","connection")

Schema name can be left empty. Last parameter is connection name as it appears on 'Datasource tables' screen.

A complete code example:

$table = $dal->Table("cars","","cars at localhost");
$rs = $table->QueryAll();
while ($data = db_fetch_array($rs))
{
echo $data["Make"].", ".$data["Model"]."
"; }

ASPRunnerPro

We have 4 options to access a table object:

1. dal.Table("table")

finds first matching table by it's name in all connections, starting with the primary connection.

2. dal.TableSchema("table", "schema")

finds table by table name and schema name

3. dal.TableSchemaConn("table", "schema", "connection")

finds table by table name, schema name and connection name

4. dal.TableConn("table", "connection")

finds table by table name and connection name

A complete code example:

set data = dal.TableConn("carscars", "cars at localhost").QueryAll()
while not data.eof
	Response.Write data("Make") & ", " & data("Model") & "
" data.MoveNext wend data.close : set data=nothing

ASPRunner.NET (C#)

We have three options to refer to a table

1. GlobalVars.dal.Table("table")

finds first matching table by it's name in all connections, starting with the primary connection.

2. GlobalVars.dal.Table("table","schema")

schema name helps to identify tables with identical names located in different schemas in databases like Oracle, Postgre and SQL Server.

3. GlobalVars.dal.Table("table","schema","connection")

Schema name can be left empty. Last parameter is connection name as it appears on 'Datasource tables' screen.

A complete code example:

var rs = GlobalVars.dal.Table("carscars","","cars at localhost").QueryAll();
XVar data;
while (data = CommonFunctions.db_fetch_array(rs))
{
	MVCFunctions.Echo(String.Format("{0}, {1} 
", data["Make"], data["Model"])); }

Method 2: using free form SQL Queries

Update all cars where make is 'Audi' making YearOfMake equals 2002

PHPRunner

$cman->byName("cars at localhost")->query("Update carscars set yearofmake=2002 where make='Audi'");

ASPRunnerPro

cman.byName_p1("cars at localhost").query_p1("Update carscars set yearofmake=2002 where make='Audi'")
PHPRunner 8.1, ASPRunnerPro 9.1, ASPRunner.NET 8.1 released

$
0
0

Great news! PHPRunner 8.1, ASPRunnerPro 9.1, ASPRunner.NET 8.1 released. Grab your copy now.

PHPRunner 8.1

More info

New purchase

Upgrade

ASPRunner.NET 8.1

More info

New purchase

Upgrade

ASPRunnerPro 9.1

More info

New purchase

Upgrade

Mobile template v2

New purchase $50

Upgrade from previous version of Mobile template $25

Here is the list of new features in this update.

Free-form design mode

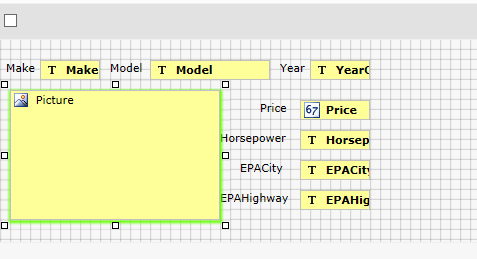
You are no longer required to use HTML tables to arranger fields on Add/Edit/View forms. Turn on free-form mode and drag-n-drop fields and labels where they need to be. This mode is available on Add/Edit/View pages and also on List page in vertical mode.

This is an example of List page edited in free form mode.


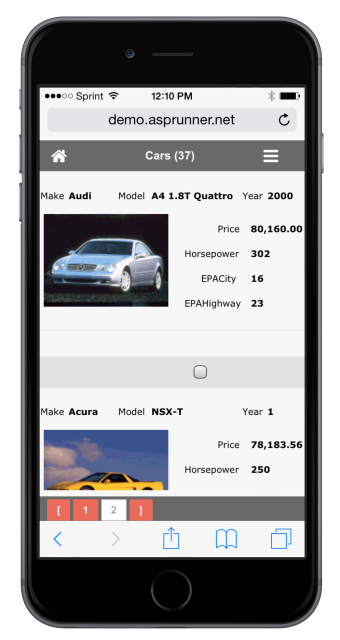
This is how it looks in generated application.

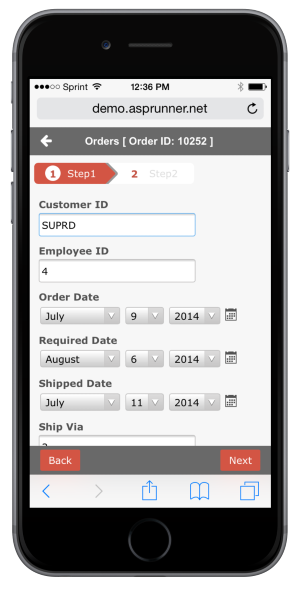
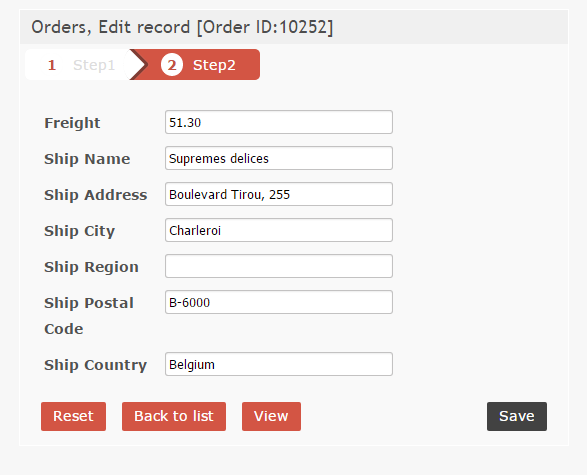
Multistep Add/Edit pages

Turn Add/Edit pages into multistep wizard-like pages.

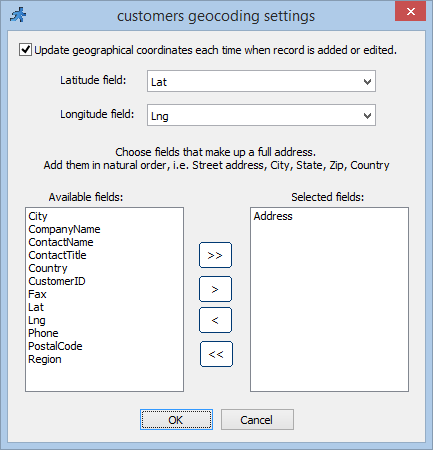
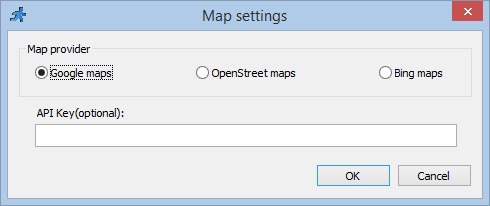
OpenStreetMap and Bing maps support, new geocoding settings

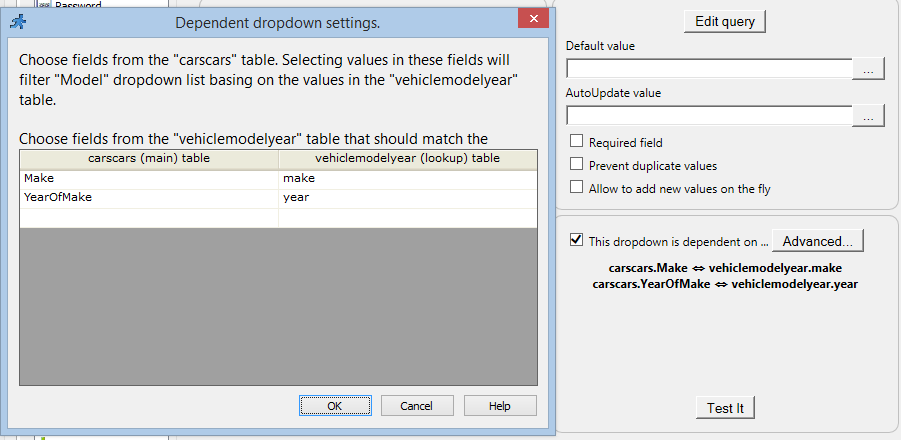
Linked dropdowns dependent by two and more fields

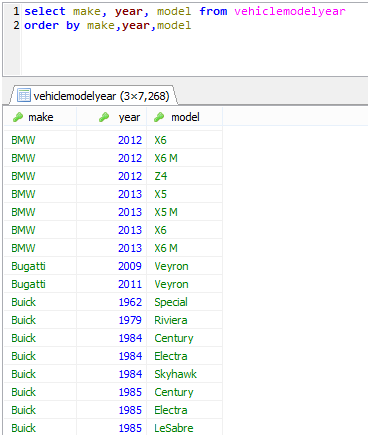
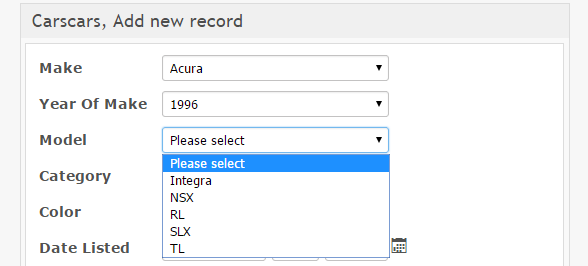
Sample MakeYearModel table.

We want user to select Make first, then YearOfMake and only list those Models that match this selection. YearOfMake is dependent on Make, Model is dependent on both Make and YearOfMake.

This is how it looks in generated application.

Actions after Add/Edit pages

Sample AfterEdit actions:
- stay on the Edit page
- go to the View page
- edit next record
- edit previous record

You can also choose what to do after "Edit in popup" action is completed (close popup or keep it open).

reCAPTCHA

Added industry standard reCAPTCHA support. Better UI and works on all mobile devices. Flash-based CAPTCHA is still supported for compatibility purposes.

Maps in dashboards

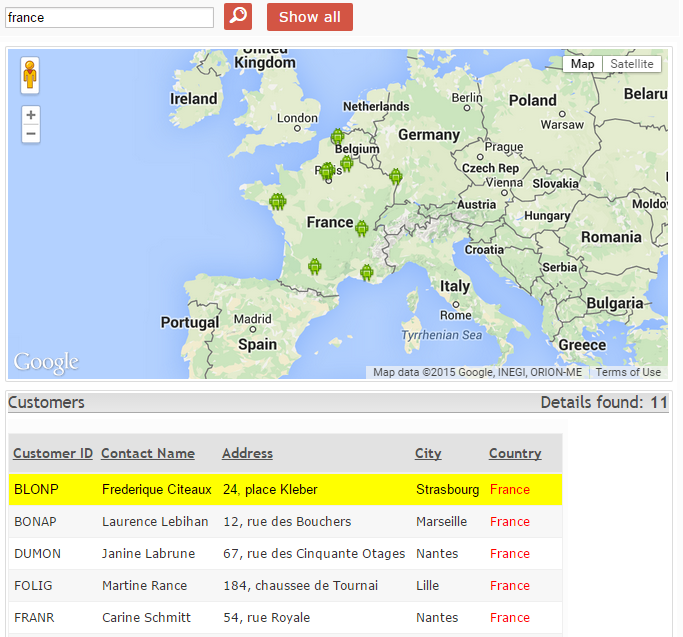
Maps can be a part of dashboard now. There are two different map modes. Map can serve as master, you can zoom in into any area on the map and related grid will only shows records in this region. In other words you can use map to filter grid contents. In second mode map simply shows all the same records that appear in the grid.

New 'View as' Map settings

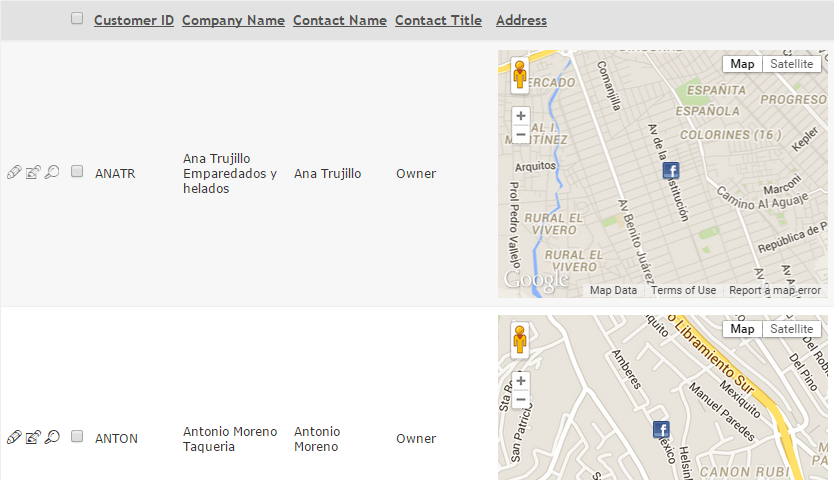
Choose custom icons to display on the map. Custom icon source can be another database field with image name or PHP expression. You can use this functionality to display different icons for different types of objects or even a custom icon for each record.

Edit details records in dashboards

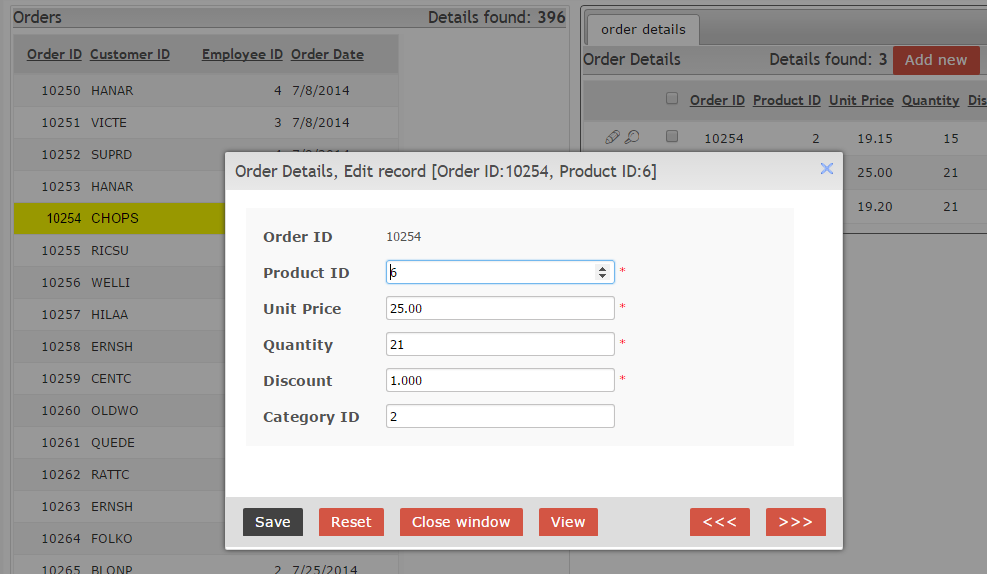
Edit/Add/Delete details records in dashboards.

New display mode of master-details

New option - show an icon instead of the list of details tables. Details tables shown in the tabs below. Especially useful when you have lots of details tables.

Printing master and details together

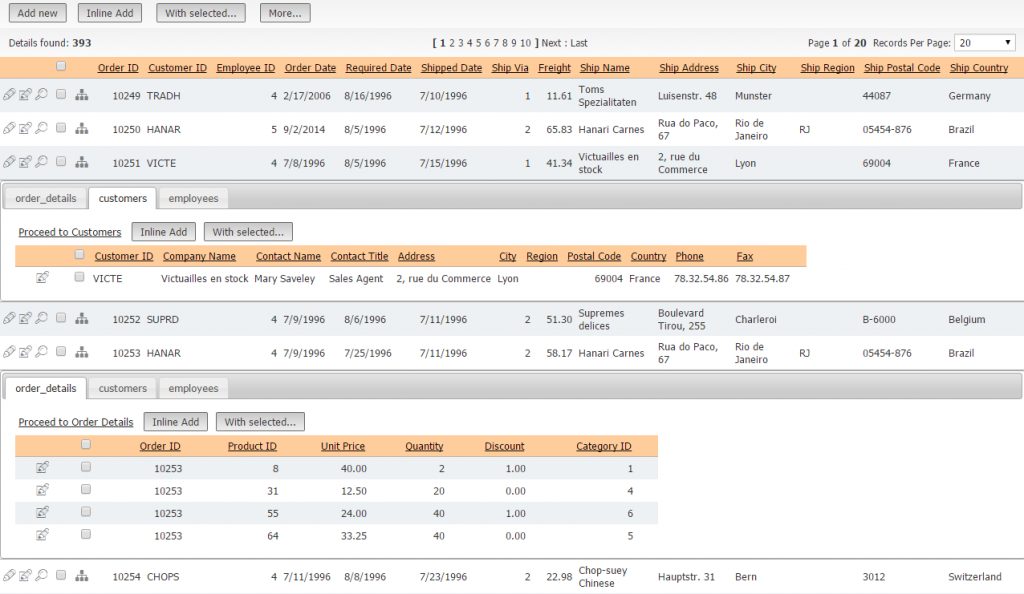
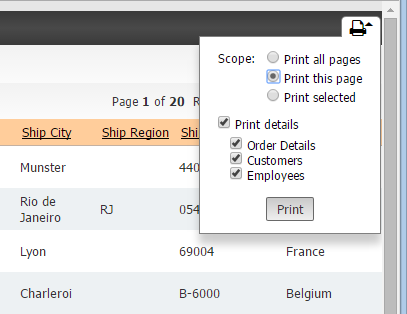
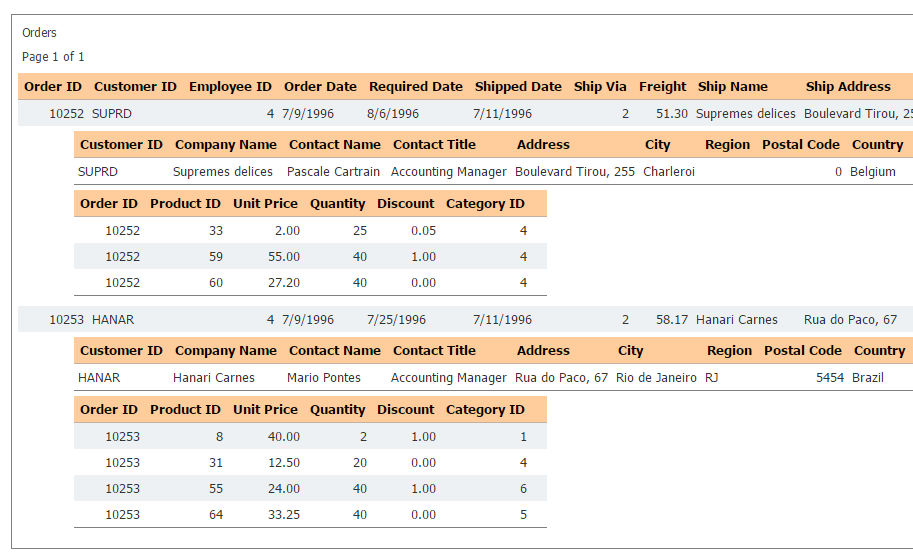
Brand new feature - you can print master and details records together. You can choose which details table to print.

This is how it looks in the live application.

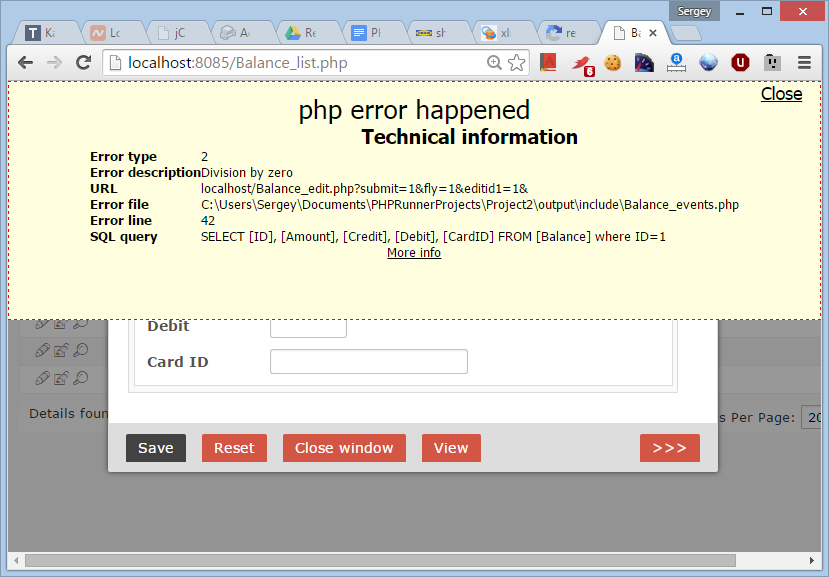
Customizable error display

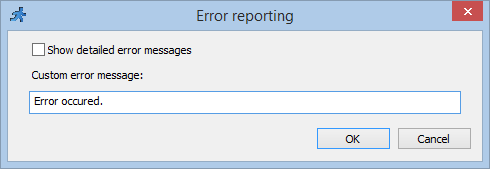
You can choose to display a standard error message or your own error message.

You can also see error happening in AJAX mode i.e. when page is displayed in popup or error happening in button's code.

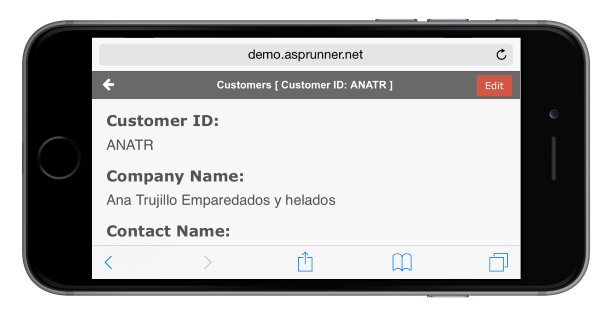
Mobile template update

Mobile template was redesigned to provide better user experience. Added fixed headers and footers with quick access to page actions.

New mapping features

$
0
0

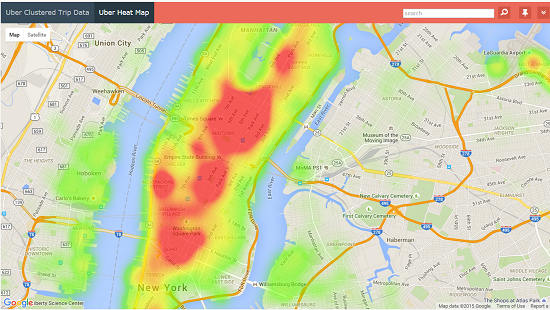
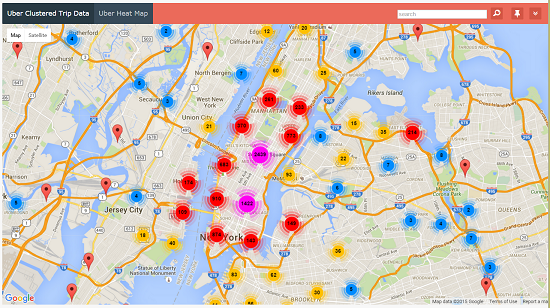
The latest version of Runner family products comes with several improvements in mapping area like support of Bing and OpenStreet maps, maps in dashboards, custom map markers etc. In this article I want to show a couple more mapping features that you can use in your apps, heat maps and clustered maps.

Live demo

Both those features can help you visualize large amounts of mapping data. It gives your users a better insight on your data. For instance, those maps tell you that if you are a taxi driver in NYC, your chances to pickup a passenger are higher if you are nearby Trump Tower.

There are some limitations that you need to bear in mind:

  • This functionality only works with Google maps
  • This functionality only works with lat/lon pairs as opposed to addresses
  • This will only work with map added to the List page via 'Insert map' function (won't work in dashboard)
  • Heat maps and clustered maps will always use all the data returned by query (as opposed to only data from the current page)

These are sample pages built-in of anonymized Uber taxi service trip data. This app uses 10,000 passenger pickup data points collected in New York City (a full dataset if you need it). Click on image to see the live app.

Heat map


Clustered map


Code

Insert a map into any list page that has lat/lon values and modify the code adding the following line at the end of map code.

PHP

// Clustering
$mapSettings['clustering'] = true;
// Heat map
$mapSettings['heatMap'] = true;

ASP

' Clustering
mapSettings("clustering") = true
' Heat map
mapSettings("heatMap") = true
C#

// Clustering
mapSettings["clustering"]=true;
// Heat map
mapSettings["heatMap"]=true;

In-place editing

$
0
0

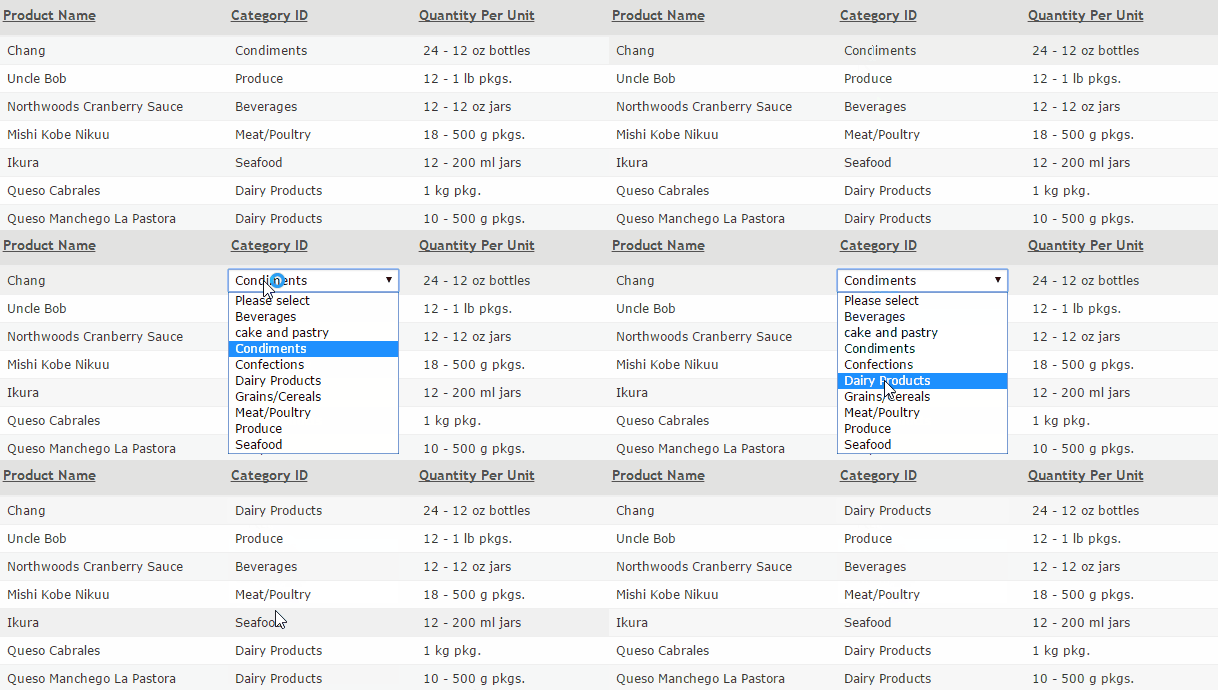
Similar to Excel-like grid discussed in previous article this technique helps you to achieve similar goals. Instead of bringing up the whole edit page you can click that single field you need to edit, change its value and see your changes posted to the database automatically.

Live demo

Click any of fields that are enabled for inline editing. Text will turn into edit control, the way it were setup in PHPRunner, ASPRunnerPro or ASPRunner.NET. To exit editing hit Esc button on your keyboard or click anywhere outside of edit control. Changes will be saved automatically.

Note that this code is designed to work with tables that only have a single key column selected. While making it work with multiple key columns is possible we didn't want to over-complicate this example.

To make this happen select one or more fields to be editable inline and add the following code to List page: Javascript OnLoad event.

Code

PHPRunner

$(document).ready(function() {

	var $elem;
	var key;
	var field;
	var val;

	function cancelEditing() {
		if ($grid.data("editing")) {
			$elem.html(val);
			$grid.data("editing", false);
			$elem.closest("td").css("padding","5px 8px");
		}
	};

	$(document).keyup(function(e) {
		if (e.keyCode == 27) {
			cancelEditing();
		}
	});

	$("span[id^=edit]").attr('title', 'Click to edit');

		$grid=$(document.body);
		$grid.on("click", function(e) {

		// click during editing outside of edited element
		if ($grid.data("editing") &&
				!$(e.target).is(":focus")	) {
			cancelEditing();
			return;
		}

		// click  on one of editable elements?
		if( $grid.data("editing") ||
				!$(e.target).attr("id") ||
				!$grid.data("editing") && $(e.target).attr("id").substring(0, 4) != "edit"
			) {
			return;
		}

		$elem = $(e.target);
		// enter editing mode
		val = $elem.html();

		$grid.data("editing", true);

		var id = $elem.parent().attr("data-record-id");
		var res=$elem.attr("id").match(/[^_]+$/);
		field = res[0];

		var gridrows = JSON.parse(JSON.stringify(pageObj.controlsMap.gridRows));
		for (var i = 0; i < gridrows.length; i++) {
			if (gridrows[i].id==id) {
				key=gridrows[i].keys[0];
				break;
			}
		}

		// prepare request
		var data = {
			id: id,
			editType: "inline",
			editid1: key,
			isNeedSettings: true
		};

		// get edit controls from the server
		$.ajax({
		type: "POST",
		url: "products_edit.php",
		data: data
		}).done(	function(jsondata) {
			var decoded = $('<div/>').html(jsondata).text();
			response = jQuery.parseJSON( decoded );

			// clear error message if any
			if ($elem.next().attr('class')=="rnr-error")
				$elem.next().remove();

			// cmake control as wide as enclosing table cell
			width = $elem.closest("td").width();

			$elem.html(response.html[field]);
			if (response.html[field].indexOf("checkbox")<0) {
				$elem.find("input,select").width(width-5).focus();
				$elem.closest("td").css("padding","1px 1px");
			}

		});

		});

$grid.data("editing", false);

 // save function
 $(document.body).on('change','input[id^=value],select[id^=value]',function() {

	var data = {
		id: 1,
		editType: "inline",
		a: "edited",
		editid1: key
	};

	var type = $(this).attr('type');
	if (type)
		type=type.toLowerCase();
	else
		type="text";

	// regular field or check box
	if (type!="checkbox") {
		data["value_"+field+"_1"]=$(this).val();
	} else {
		if($(this).is(":checked")) {
            val="on";
        }
		data["value_"+field+"_1"]=val;
		data["type_"+field+"_1"]="checkbox";
	}

	// clear error message if any
	if ($(this).next().attr('class')=="rnr-error")
			$(this).next().remove();

	// save data
	$.ajax({
	  type: "POST",
	  url: "products_edit.php?submit=1",
	  data: data
		}).done(	function(jsondata) {
			var decoded = $('<div/>').html(jsondata).text();
			response = jQuery.parseJSON( decoded );
			if (response["success"]==false) {
				$("<div class=rnr-error/>").insertAfter($elem).html(response["message"]);
			}
			else {
				$elem.html(response["vals"][field]);
				$grid.data("editing", false);
				$elem.closest("td").css("padding","5px 8px");
			}
		});
    });
});

You will have to modify the Edit page URL accordingly to your project settings. Replace products_edit.php with corresponding name of your table i.e. tablename_edit.php.

ASPRunnerPro

Replace products_edit.php with corresponding name of your table i.e. tablename_edit.asp.

ASPRunner.NET

No changes are required. Code goes to List page: Javascript OnLoad event.

$(document).ready(function() {

	var $elem;
	var key;
	var field;
	var val;

	function cancelEditing() {
		if ($grid.data("editing")) {
			$elem.html(val);
			$grid.data("editing", false);
			$elem.closest("td").css("padding","5px 8px");
		}
	};

	$(document).keyup(function(e) {
		if (e.keyCode == 27) {
			cancelEditing();
		}
	});

	$("span[id^=edit]").attr('title', 'Click to edit');

		$grid=$(document.body);
		$grid.on("click", function(e) {

		// click during editing outside of edited element
		if ($grid.data("editing") &&
				!$(e.target).is(":focus")	) {
			cancelEditing();
			return;
		}

		// click  on one of editable elements?
		if( $grid.data("editing") ||
				!$(e.target).attr("id") ||
				!$grid.data("editing") && $(e.target).attr("id").substring(0, 4) != "edit"
			) {
			return;
		}

		$elem = $(e.target);
		// enter editing mode
		val = $elem.html();

		$grid.data("editing", true);

		var id = $elem.parent().attr("data-record-id");
		var res=$elem.attr("id").match(/[^_]+$/);
		field = res[0];

		var gridrows = JSON.parse(JSON.stringify(pageObj.controlsMap.gridRows));
		for (var i = 0; i < gridrows.length; i++) {
			if (gridrows[i].id==id) {
				key=gridrows[i].keys[0];
				break;
			}
		}

		// prepare request
		var data = {
			id: id,
			editType: "inline",
			editid1: key,
			isNeedSettings: true
		};

		// get edit controls from the server
		$.ajax({
		type: "POST",
		url: "edit",
		data: data
		}).done(	function(jsondata) {
			var decoded = $('<div/>').html(jsondata).text();
			response = jQuery.parseJSON( decoded );

			// clear error message if any
			if ($elem.next().attr('class')=="rnr-error")
				$elem.next().remove();

			// cmake control as wide as enclosing table cell
			width = $elem.closest("td").width();

			$elem.html(response.html[field]);
			if (response.html[field].indexOf("checkbox")<0) {
				$elem.find("input,select").width(width-5).focus();
				$elem.closest("td").css("padding","1px 1px");
			}

		});

		});

$grid.data("editing", false);

 // save function
 $(document.body).on('change','input[id^=value],select[id^=value]',function() {

	var data = {
		id: 1,
		editType: "inline",
		a: "edited",
		editid1: key
	};

	var type = $(this).attr('type');
	if (type)
		type=type.toLowerCase();
	else
		type="text";

	// regular field or check box
	if (type!="checkbox") {
		data["value_"+field+"_1"]=$(this).val();
	} else {
		if($(this).is(":checked")) {
            val="on";
        }
		data["value_"+field+"_1"]=val;
		data["type_"+field+"_1"]="checkbox";
	}

	// clear error message if any
	if ($(this).next().attr('class')=="rnr-error")
			$(this).next().remove();

	// save data
	$.ajax({
	  type: "POST",
	  url: "edit?submit=1",
	  data: data
		}).done(	function(jsondata) {
			var decoded = $('<div/>').html(jsondata).text();
			response = jQuery.parseJSON( decoded );
			if (response["success"]==false) {
				$("<div class=rnr-error/>").insertAfter($elem).html(response["message"]);
			}
			else {
				$elem.html(response["vals"][field]);
				$grid.data("editing", false);
				$elem.closest("td").css("padding","5px 8px");
			}
		});
    });
});

Testing web apps in mobile mode

$
0
0

Experienced developers won't find anything in this article they didn't know already. All others will find it quite useful. We'll show a few different ways of how you can quickly test the mobile version of your application.

This article applies to PHPRunner, ASPRunnerPro and ASPRunner.NET with Mobile template option enabled.

1. Using your web browser

All modern browsers have an option to show any page the way it will appear on mobile device. In this article will show you how to do this using Chrome web browser.

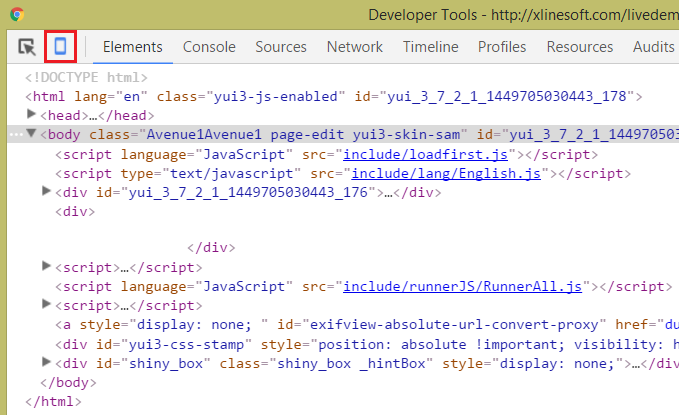
1.1 Hit F12 to open Chrome Developers Tools. Click Mobile device icon in Chrome Developer tools.


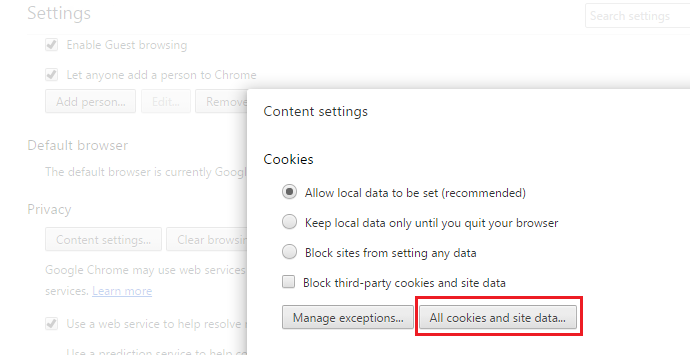
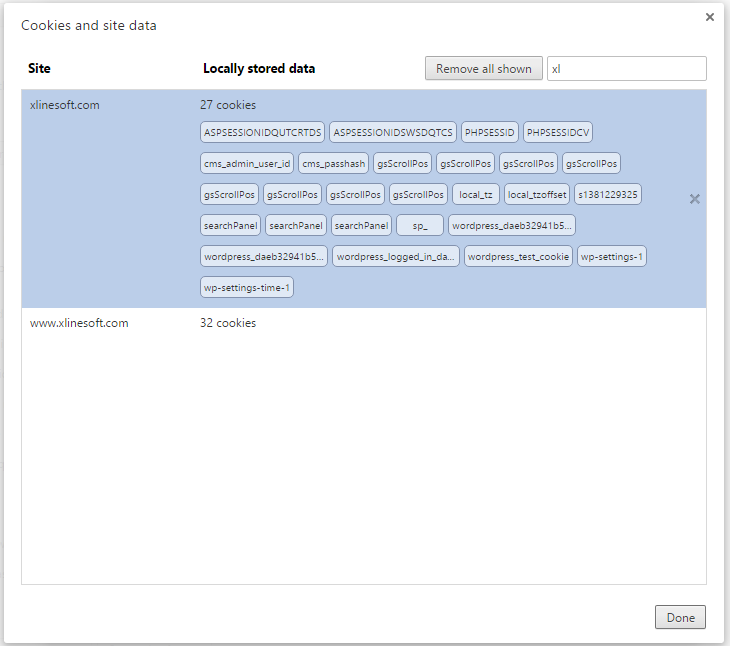
1.2 Your app now switches to mobile mode but since we store device info in cookies/session you need to reset cookies for this app. Personally I suggest using EditThisCookie Chrome plugin as it only takes a couple of mouse clicks to clear cookies for the current website.

You can also do that using built-in tools. You can delete all cookies for selected website. Just make sure you are not deleting all cookies for all websites.

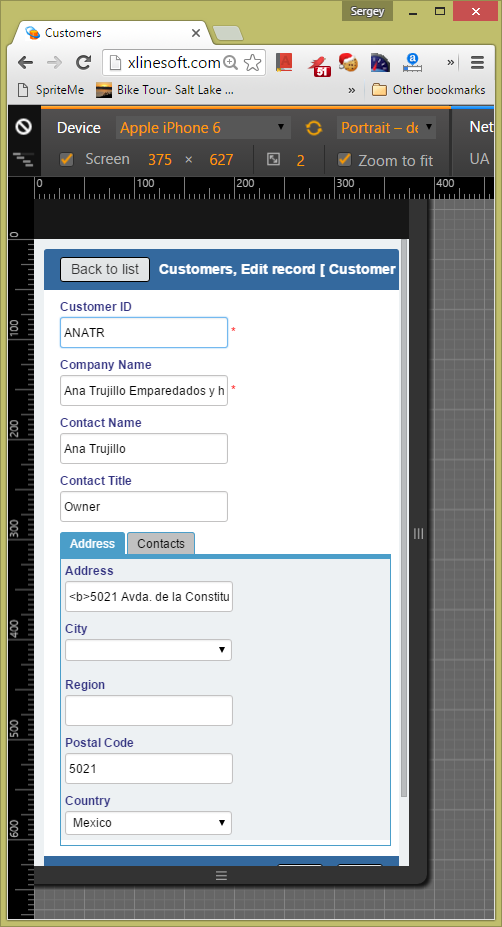
1.3 If you done everything right this is what you going to see. You can choose different device types, horizontal or vertical orientation etc.

2. Using your mobile device

If your mobile device and desktop computer are on the same network you can test your app using your smartphone or tablet. Note that built-in web server that comes with PHPRunner, ASPRunnerPro or ASPRunner.NET is only designed for local testing. You will need to use your own web server like XAMPP or IIS.

Choose output folder under your web server root folder i.e. c:\xampp\htdocs\project1 then open a URL like http://desktop_computer_name/project1 in your browser on mobile device.

Another option - post your project to Demo Account, copy the link, email it to yourself. On your mobile device open that email and click the link.

Happy coding!

Technology choices

$
0
0

Technology choices we make can make or break your web application. Here are a few things I'd like to share based on my experience as a web developer.

1. Programming language

Not all programming languages created equal. This is especially true when we talk about ASP aka "Classic ASP". Microsoft stopped developing ASP back in 1999. Once a modern and extensible web programming language it is now a dinosaur trying to compete with spaceships. Every new release of IIS makes configuring ASP more difficult. It is now turned off by default, detailed error messages turned off, 32-bit apps are disabled by default etc. I won’t be surprised if Microsoft stops shipping ASP with IIS at some point. Not to mention that ASP apps run much slower than similar apps built with ASP.NET or PHP.

While this sounds pretty straightforward we live in world that is far from perfect. You may find yourself stuck supporting legacy ASP applications or your IT department won’t allow to run anything but classic ASP on company servers. This does happen more often than one might think. What you can do though is to educate people around you that better alternatives are available. This is what we all have to do as web developers - to promote better, newer technologies.

If you use ASPRunnerPro at least consider using PHPRunner or ASPRunner.NET when you start a brand new project. If you need to switch from ASPRunnerPro to PHPRunner or ASPRunner.NET feel free to contact me directly and I’ll arrange a good deal for you.

2. Web browser

It’s safe to say that Internet Explorer is a single web browser that causes most headaches among web developers. Even though recent versions of IE come with decent support of web standards the decisions Microsoft makes never fail to surprise you. For instance, in Internet Explorer 11 ‘Compatibility mode for intranet websites’ is turned on by default making any app that uses icon fonts look bad while running on your intranet.

Again, switching the whole company from Internet Explorer to Chrome or Firefox is a difficult step that not everyone is ready. What we all can do is to promote the use or alternative web browsers so IE is not the only choice your company users have.

3. Database

We are going to talk about Microsoft Access here. Microsoft again, huh? Not their fault though. They made a great piece of software that is so convenient and easy to use that people would use it for anything. And this is where issue arises: while MS Access is a fine choice for desktop databases or quick prototypes using it as a datasource for any sort or serious web development is not recommended.

Here are some cons:
Microsoft Access is a file-based database. Something happens when file is open you may lose all your data.
Making backups/uploading new database to the website - you always need to download or upload the whole database.

Since this is a file it may be locked by the web server won’t letting you upload a new copy of the database. You will have to stop your website, upload database, start website again. A little bit of extra pain in the neck.

We have seen some large web hosting companies dropping Microsoft Access support recently. While our web hosting still supports Microsoft Access as a database choice everyone’s life would be easier.

What are alternatives? The obvious choices are MySQL and SQL Server. PostgreSQL was picking a lot of traction recently and is a viable choice.

Happy coding and stay tuned!

Running ASPRunner.NET and PHPRunner apps on Microsoft Azure

$
0
0

In this article we'll show how to deploy PHPRunner or ASPRunner.NET application to Microsoft Azure cloud. I assume you already have an account with Azure, if not, you can create one here.

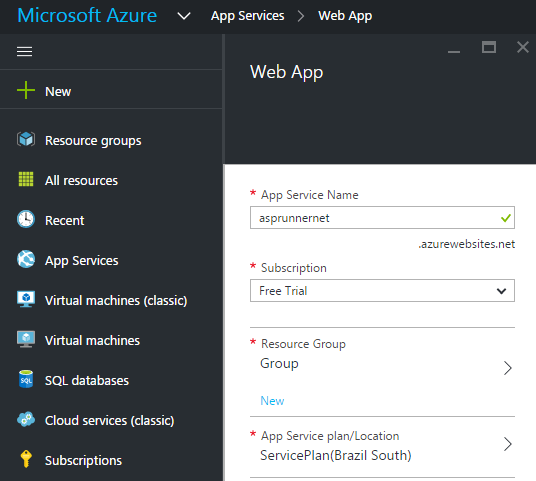
1. Create new application


2. Application settings

Under Tools->Applications settings you can leave default settings that such as .NET Framework 4.6 and PHP 5.4

3. Test application

At this moment you should be able to open your application URL like this one in web browser: http://asprunnernetproject1.azurewebsites.net/

4. Deployment settings

Now we need to upload our PHPRunner or ASPRunner.NET application to Azure. For simplicity sake we will use FTP upload. Proceed to
Tools->Deployment credentials, enter FTP username/password.

You can upload your application using built-in FTP upload tool or use any third party FTP software. Make sure you upload all files and folders under output directory, including empty folders.

Here are sample settings for ASPRunner.NET or PHPRunner.

FTP server: ftp://waws-prod-cq1-005.ftp.azurewebsites.windows.net

Username: asprunnernetproject1\asprunnernetsergey

Password: ******

Upload folder: /site/wwwroot

URL: http://asprunnernetproject1.azurewebsites.net/

Once uploaded open your application URL in web browser again and it should work at this point

5. SQL Server database

If you use a database like MS Access or your own SQL Server/MySQL/Postgre server your job is done here and application is ready to go. You can also take it one step further and make your application use SQL Server provided by Azure.

To create a new SQL Server database proceed to 'SQL databases' and click 'Add'.

Enter server name, database name, create database user. For test we chose to start with sample database, you may want to start with a blank database and upload your own data after that.

Here are sample connection settings to be used to PHPRunner/ASPRunner.NET.

Note that if you try to connect right now you will get the following error message.

By default remote connections are not allowed. Luckily the error message itself tells us what we need to do. We need to proceed to our database in Azure control panel, click 'Open in Visual Studio' and add a firewall rule allowing connections from our IP address. Luckily, Azure shows your IP address right there and you don't need to guess it.

Now you can connect to your database hosted on Azure from PHPRunner or ASPRunner.NET.

6. MySQL database

Similar steps will be required to create and configure a MySQL database. Instead of 'SQL Databases' you will need to go to Marketplace and choose MySQL database (ClearDB) there.

This is what you need to know to get started with Windows Azure and PHPRunner/ASPRunner.NET. Happy cloud computing!

Adding badges to application menu

$
0
0

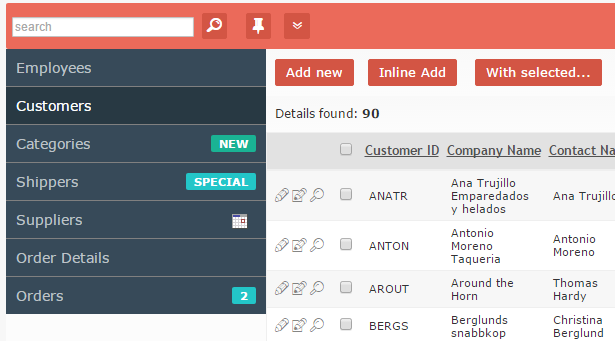
In this post we'll show how to spice up your application menu drawing attention to new and important items. For this purpose we'll be using so called menu badges.


These badges can be text, images or numbers. You can add this functionality to your project in two easy steps.

1. Custom CSS

Add the following code to 'Custom CSS' section of Style Editor.

.badge-green {
background-color: #1ab394;
}

.badge-blue {
background-color: #23c6c8;
}

.badge {
    color: #FFFFFF;
    font: 11px "Helvetica Neue", Helvetica, Arial, sans-serif;
    font-weight: 600;
    padding: 2px 8px;
    text-shadow: none;
    border-radius: .25em;
    float: right!important;
}

2. MenuItemModify event

PHPRunner

$title = $menuItem->getTitle();

if ($title=="Categories") {
       // display some text
	$title.="<span class='badge badge-green'>NEW</span>";
  $menuItem->setTitle($title);
}
if ($title=="Shippers") {
	$title.="<span class='badge badge-blue'>SPECIAL</span>";
  $menuItem->setTitle($title);
}
if ($title=="Suppliers") {
       // display some image
	$title.="<span class='badge'><img src='images/cal.gif'></span>";
  $menuItem->setTitle($title);
}
if ($title=="Orders") {
       // display numbers of today's orders
	$count = DBLookup("select count(*) from orders where DATE(OrderDate) = CURDATE()");
	$title.="<span class='badge badge-blue'>".$count."</span>";
  $menuItem->setTitle($title);
}
return true;

ASPRunner.NET

string title = menuItem.getTitle();
if (title == "Carscars") {
	title+="<span class='badge badge-green'>NEW</span>";
	menuItem.setTitle(title);
}
if (title == "Carsmake") {
	title+="<span class='badge'><img src='../images/cal.gif'></span>";
	menuItem.setTitle(title);
}
if (title == "Carsmodels") {
	string count = tDAL.DBLookup("select count(*) from Carsmodels");
	title+="<span class='badge badge-green'>" + count + "</span>";
	menuItem.setTitle(title);
}
return true;

ASPRunnerPro

title = menuItem.getTitle()
  if title="Carscars" then
                       ' display some text
			title = title & "<span class='badge badge-green'>NEW</span>"
      menuItem.setTitle_p1(title)
  end if
  if title="Carsform" then
                       ' display some image
			title = title & "<span class='badge'><img src='images/cal.gif'></span>"
      menuItem.setTitle_p1(title)
  end if
  if title="Orders" then
                       ' display some text
			count=DBLookup("select count(*) from orders where DATE(OrderDate) = CURDATE()")
			title = title & "<span class='badge badge-blue'>" & count & "</span>"
      menuItem.setTitle_p1(title)
  end if

ModifyMenuItem = true

Speed-up data entry

$
0
0

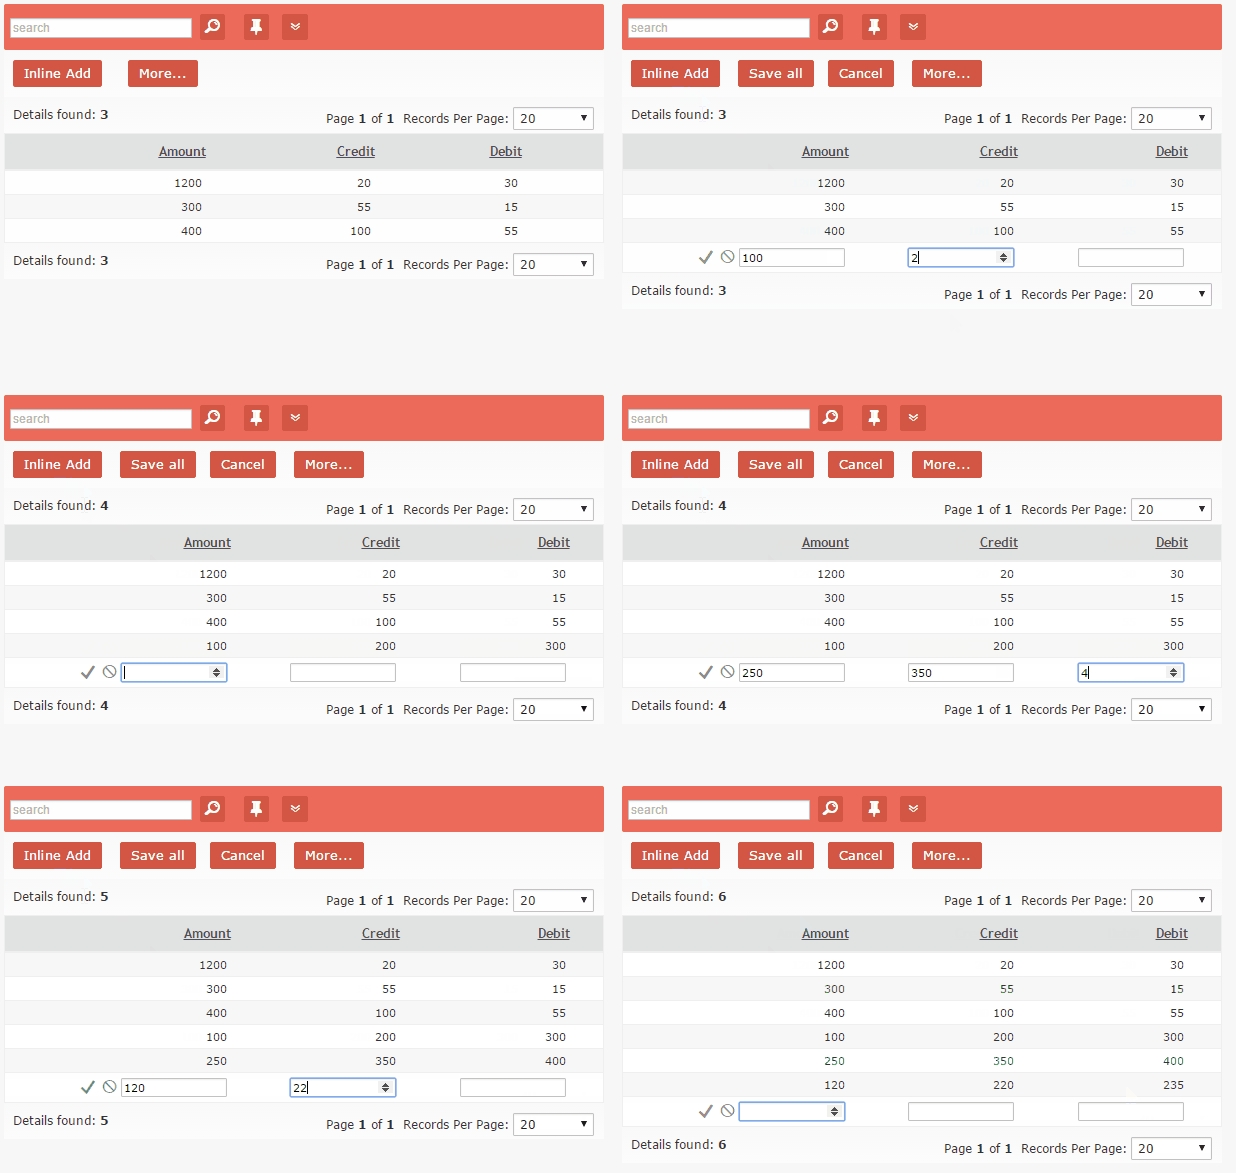
We continue series of posts that show how to make you PHPRunner/ASPRunnerPro/ASPRunner.NET apps behave in Excel-like way. In this article we'll show how you can speed-up data entry in inline mode eliminating the need to click 'Inline Add' and 'Save' buttons multiple times.


Here is the code that needs to be added to List page: Javascript OnLoad event. Now you can click 'Inline Add' once and just type in your data pressing tab to move from field to field. This script does the rest of the job.

pageObj.addNewRecordsToBottom = true;

th_id1 = "";
th_id2 = "";
th_key = 0;

$("body").keydown(function(e) {
if(e.keyCode == 9){
th_id1 = e.target.id.substring(0,6);
pos = e.target.id.lastIndexOf("_");
if(pos>0)
th_key = e.target.id.substring(pos+1);
}
});

$("body").keyup(function(e) {
if(e.keyCode == 9) {
	th_id2 = e.target.id.substring(0,6);
	if(th_id1 == "value_" && th_id2 != "value_"){
		$("#saveLink"+th_key).click();
		$("#inlineAdd"+pageid).click();
		}
	}
});

MassMailer template use case

$
0
0

MassMailer template v2 was updated. This is a free upgrade for existing MassMailer template v2 owners. More info.

MassMailer template can be used for more than just sending bulk emails. Lets consider the case where you manage a table with usernames and passwords for your internal company application. For increased security users should change passwords every 60 days. As an administrator you need to perform two standard tasks:

  1. Set reminders to users when their password is about to expire
  2. Mark their account as inactive when password expires

We'll show how this can be done with the help of MassMailer template. In this example we'll be using MySQL and here is how our table with logins and passwords looks. Only users where 'active' field equals 1 are able to logon.

1. Send a reminder two days before password expires

This is fairly straightforward. Here is the SQL query we can use:

select * from login where DATEDIFF(expires, now())=2

Assuming that today is January 29th, 2016 this query returns one record (dave.p). We can setup this task to run once a day and Dave.P will receive a nice "do not forget to change your password" reminder.

Please note that this SQL query syntax is MySQL specific. Refer to Date/time handling in web applications article for other databases syntax.

2. Make login expire

This one is more interesting. This task is going to also run once a day and change 'active' column for those accounts that expire today to 0.

SQL Query is very similar:

select * from login where DATEDIFF(expires, now())=0

Email body will say something like this:

Dear %username%

Your account has expired. Call administrator at 1-800-XXX-XXXX in order to restore your access.

This is what we going to put into 'Execute SQL query after email sent' field

update login set active=0 where id = %main.id%

This is it. Now we have two tasks that take care of sending reminders and marking accounts as expired. In real life you may want to send more reminders or do something more sophisticated than make your users call system admin when their accounts expires.

Happy coding!

Bootstrap based templates

$
0
0

In PHPRunner 9.0, ASPRunnerPro 10.0 and ASPRunner.NET 9.0 we are adding support for Bootstrap-based templates. We expect beta version to be available in 2-3 weeks. Meanwhile take a peek at new features you can expect in this update.

Live demo

Use test/test or admin/admin to logon.

Bootstrap templates and themes

New version comes with 15 Bootstrap themes and you can add your own.


New start page

This is a menu page upgrade. Once finished it will look like this one, you will be able to choose a several most important menu items and display them on start page along with short description.

Once finished it will look like this.

Breadcrumbs menu

Right now it only appears on List pages. Will be added to Add/View/Edit pages as well.

Master table info on Add/Edit/View of details

Master-details visual improvements

We added an option to display number of details in nice rounded colored badges.

More options to customize master table Add/Edit/View pages

When you need to Add or Edit master and details together you can just drag-n-drop details tables where they need to appear.

And this is how it looks in generated application.

Desktop version of the application

This feature will be available in PHPRunner only and desktop apps will run on Windows only. We'll see if this can be extended to other platforms.

PHP 7 support

This is, apparently, PHPRunner only.

Troubleshooting SQL queries

$
0
0

Web applications generated by PHPRunner, ASPRunner.NET or ASPRunnerPro communicate with databases via means of SQL queries. Whenever you search, edit or delete data your web application issues a series of SQL queries, gets results back and displays it on the web page. Understanding the basics of SQL will help you build better apps and find errors faster.

Our code generator come will handy option to display all SQL queries application executes. For this purpose you can add the following line of code to AfterApplicationInitialized event:

In PHPRunner

$dDebug = true;


In ASPRunner.NET (C#)

GlobalVars.dDebug = true;

In ASPRunnerPro

dDebug = true

Lets see how this option can help us troubleshoot your web applications.

1. Troubleshooting Advanced Security mode.

Consider a real life example. Customer opens a ticket that Advanced Security mode "Users can see and edit their own data only" doesn't work. Customers are supposed to see their own orders only but see all of them.

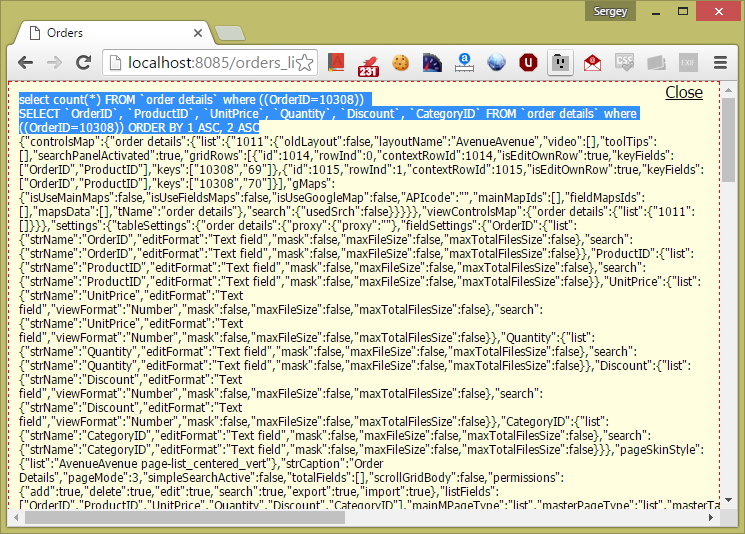
Turning on SQL debugging shows us the following:

select count(*) FROM `orders`
SELECT `OrderID`,`CustomerID`,`EmployeeID`,`OrderDate` FROM `orders` ORDER BY 1 ASC

First query calculates number of records that matches the current search criteria. Second query actually retrieves the data. As you can see there is no WHERE clause that restricts data to the current logged user. All orders are shown.

After checking project settings we figured out that all users were accidentally added to the Admin group (admin users can see all data). Once fixed, correct SQL query is produced and only orders that belong to ANATR customer are displayed.

select count(*) FROM `orders` where (CustomerID='ANATR')
SELECT `OrderID`,`CustomerID`,`EmployeeID`,`OrderDate` FROM `orders` where (CustomerID='ANATR') ORDER BY 1 ASC

2. Troubleshooting Master-Details in AJAX mode

Master-details drill-down functionality is implemented via AJAX. AJAX requests are send to the server behind the scene and usually response is expected in very specific format (JSON). Adding anything to the output like SQL queries will break master-details functionality however we still can see SQL queries that retrieve details.

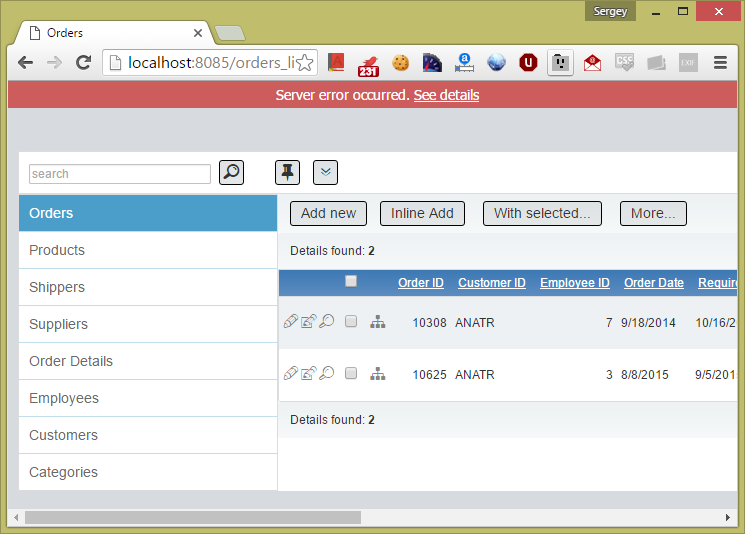
For instance, we link Orders and 'Order Details' as Master-Details. If we enable SQL query debugging mode and try to expand details we get error message as follows.

However if we click 'See details' link we will see the same two SQL queries that retrieve data from 'Order Details' table.

3. Troubleshooting buttons

Troubleshooting button's code that executes SQL queries is a bit more trickier. We are going to dig a little deeper using Developers Tools in Chrome web browser.

For instance, we have added a button to Orders grid that copies selected order to OrdersArchive table. Here is our Server code (PHP).

$record = $button->getCurrentRecord();
$sql = "insert into OrdersArchive (OrderID, OrderDate, CustomerID)
values (".$record["OrderID"].",'".$record["OrderDate"]."',".$record["CustomerID"].")";
CustomQuery($sql);

For some reason this button doesn't work, no records appear in OrdersArchive table when we click it. We need to make sure that our SQL query is correct.

First step is to open Chrome Developer Tools by clicking F12. Similar tools also exist in Firefox and Internet Explorer and F12 is the common hot key to open developers console.

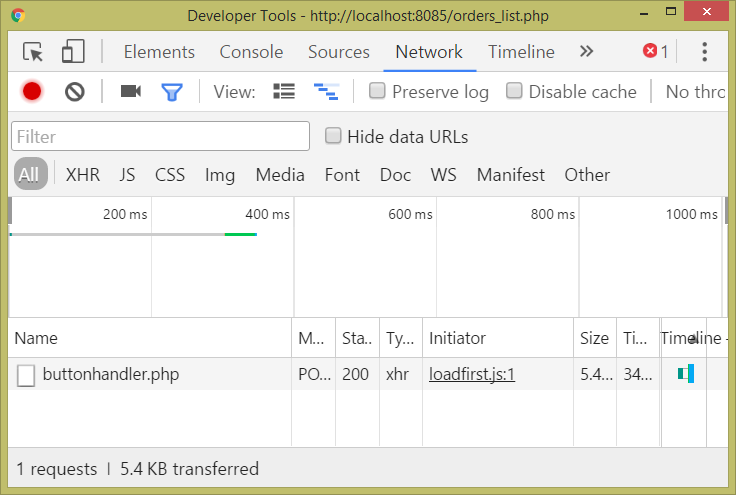
Go to 'Network' tab. Click 'Copy to archive' button. You can see a request being sent to buttonhandler.php file.

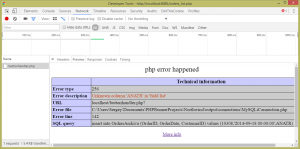
Click 'buttonhandler.php' and go to 'Preview' tab. You can see the error message there (Unknown column 'ANATR' in 'field list') along with complete SQL Query.

Probably you have spotted the error already. The text value of ANATR must be wrapped by single quotes like this: 'ANATR'.

Here is how we need to fix our code:

$record = $button->getCurrentRecord();
$sql = "insert into OrdersArchive (OrderID, OrderDate, CustomerID)
values (".$record["OrderID"].",'".$record["OrderDate"]."','".$record["CustomerID"]."')";
CustomQuery($sql);

Better yet, we can use DAL which gives us cleaner code and also takes care of quoting automatically:

global $dal;
$record = $button->getCurrentRecord();

$tblArchive = $dal->Table("OrdersArchive");
$tblArchive->Value["OrderID"]=$record["OrderID"];
$tblArchive->Value["OrderDate"]=$record["OrderDate"];
$tblArchive->Value["CustomerID"]=$record["CustomerID"];

$tblArchive->Add();

And the same code for ASPRunner.NET:

dynamic record = button.getCurrentRecord();
dynamic tblArchive = GlobalVars.dal.Table("OrdersArchive");
tblArchive.Value["OrderID"] = record["OrderID"];
tblArchive.Value["OrderDate"] = record["OrderDate"];
tblArchive.Value["CustomerID"] = record["CustomerID"];
tblArchive.Add();

And for ASPRunnerPro:

DoAssignment record, button.getCurrentRecord()

dal.Table("OrdersArchive").Value("OrderID")=record("OrderID")
dal.Table("OrdersArchive").Value("OrderDate")=record("OrderDate")
dal.Table("OrdersArchive").Value("CustomerID")=record("CustomerID")
dal.Table("OrdersArchive").Add()

New charting functionality: AnyChart 7 support

$
0
0

In PHPRunner 9, ASPRunner.NET 9.0 and ASPRunnerPro 9.5 we are switching to new version of charting components: AnyChart 7. What does this mean for you as a user?

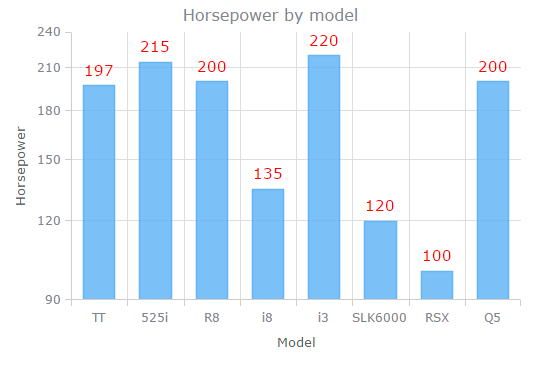
  • AnyChart 7 is Javascript based. No more Flash charts, works out of the box on all devices
  • AnyChart 7 provides better user experience, more functionality, better looking charts
  • We are adding ChartModify event that would allow you to tweak charts appearance and behaviour in endless ways. You can copy and paste basically any example from AnyChart manual as is.

Below are a few examples of how you can use ChartModify event.

Add horizontal scroller

var currentScroller = chart.xScroller();
currentScroller.enabled(true);

Add horizontal scroller and set initial zoom to 50%


var zoom = chart.xZoom();
zoom.setTo(0, 0.5);

var currentScroller = chart.xScroller();
currentScroller.enabled(true);

Change labels color and font size

Using separate API calls to set series color and font size:

// Gets series by index, 0 - first series, 1 -second series etc
var series = chart.getSeriesAt(0);
series.labels(true);
series.labels().fontSize(15);
series.labels().fontColor("#ff0000");

Setting several labels parameters in one go:

// Gets series by index, 0 - first series, 1 -second series etc
var series = chart.getSeriesAt(0);
series.labels(true);
series.labels.{fontSize: 15, fontColor: "#ff0000"});

More info on modifying labels appearance

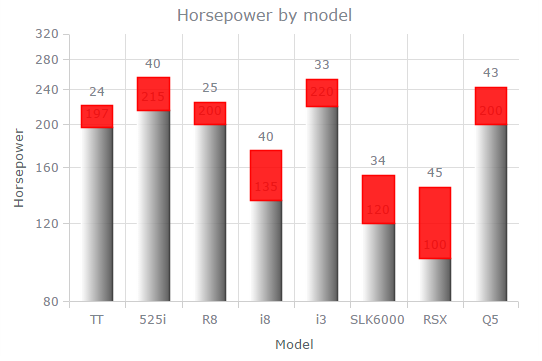
Series appearance

Single color:

// Gets series by index, 0 - first series, 1 -second series etc
var series = chart.getSeriesAt(0);
series.color("#FF0000", 0.25);

Gradient fill:

// Gets series by index, 0 - first series, 1 -second series etc
var series = chart.getSeriesAt(0);
series.color(["#FEFEFE", "#424242"], 0.69, 0.59);

More info on changing series colors

Customize chart title

Change title color:

chart.title().fontColor("#FF0000");

Change title and color:

chart.title({text: "Custom title", fontColor: "#F44336"});

Disable title:

chart.title(false);

More about title customization

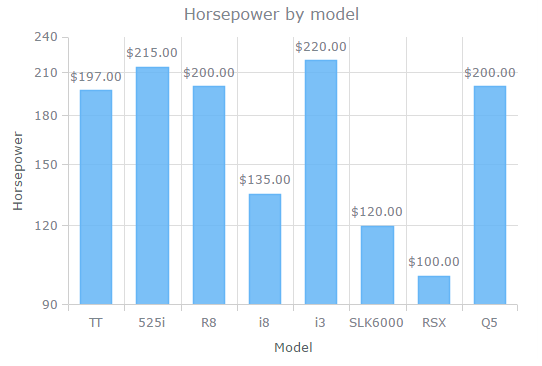
Values formatting

Formatting values as currency. You can use any Javascript code to format values.

var series = chart.getSeriesAt(0);
series.labels().textFormatter(function(){
        var num = Number(this.value);
	return(("$"+num.toFixed(2)));
});

More info on text formatters

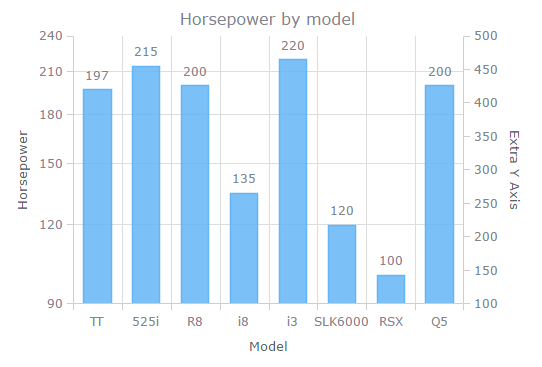
Multiple Y-axis

Here is how to add an extra Y-axis on the right ranging from 100 to 500 with ticks after each 25 points:

  var extraYScale = anychart.scales.linear();
  extraYScale.minimum(100);
  extraYScale.maximum(500);
  var extraTicks = extraYScale.ticks();
  extraTicks.interval(25);

  // Create and tune additional y axis
  var extraYAxis = chart.yAxis(1);
  extraYAxis.orientation("right");
  extraYAxis.scale(extraYScale);
  extraYAxis.title("Extra Y Axis");

More info on additional axis

Passing data to chart from server side

We can use a technique here similar to what we use in Javascript OnLoad event.

1. In BeforeDisplay event we pass some data to Javascript event via proxy object

2. We use this proxy object in ChartModify event

BeforeDisplay event, PHP:

$pageObject->setProxyValue("name", $_SESSION["UserID"]);

BeforeDisplay event, ASP:

pageObject.setProxyValue "name", SESSION("UserID")

BeforeDisplay event, C#:

pageObject.setProxyValue("name", XSession.Session["UserID"]);

ChartModify event:

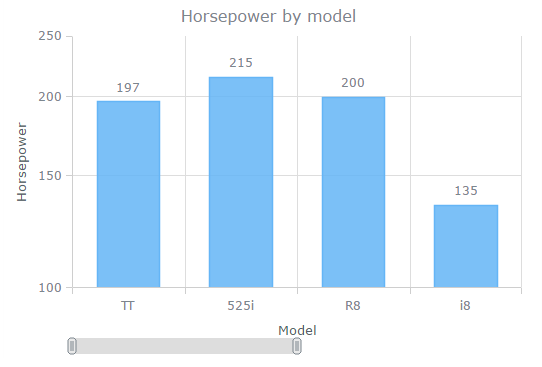
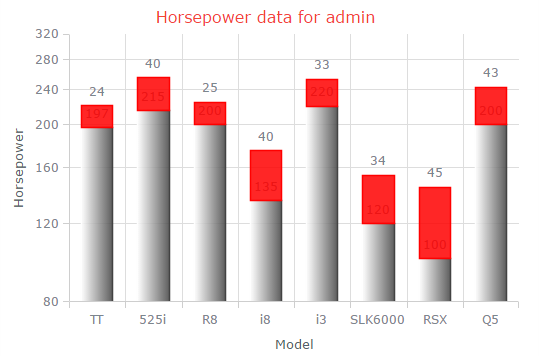
chart.title({text: "Horsepower data for "+proxy.username, fontColor: "#F44336"});

And this is what we get as a result. Current user name is displayed as a part of chart title.

Displaying a popup in PHPRunner 9.0, ASPRunnerPro 9.5, ASPRunner.NET 9.0

$
0
0

In this new version we are providing an easy way to display any page in Bootstrap popup window. Welcome, Runner.displayPopup() function.

The simplest form is really simple. There is only one mandatory parameter, URL of the page to be displayed. You can use this function anywhere you can use Javascript code i.e. in Javascript OnLoad event or ClientBefore event of custom button.

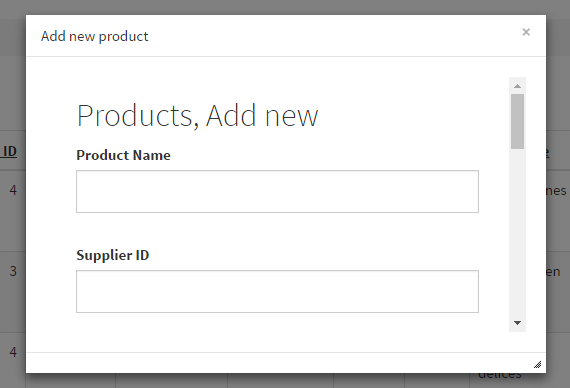
Here is how you can display Add page of Products table in popup:

Runner.displayPopup( {
	url: "products_add.php"
});


Here is the complete list of parameters:

url: URL of the page to be displayed

html: instead of specifying URL you can supply HTML code to be displayed in popup window

header: to be displayed in popup header section

footer: to be displayed in popup footer section

afterCreate: function to be called after popup window is created

beforeClose: function to be called before popup window is closed.
Return false to prevent popup from being closed. Return true to proceed with closing.

width: popup width in pixels

height: popup height in pixels

More examples.

Simple popup window

var win = Runner.displayPopup( {
	url: "products_add.php",
	width: 700,
	height: 500,
	header: 'Add new product'
});

Using HTML instead of URL

var win = Runner.displayPopup( {
		html: "<h1>Hello world!</h1><p>It works</p>",
		header: 'Custom popup text'
});

Use of close()

var win = Runner.displayPopup( {
	url: "products_add.php",
	width: 500,
	height: 300,
	header: 'Add new product'
});

alert('That was an example of popup window');

win.close();

Use of afterCreate() event

var win = Runner.displayPopup( {
	url: "products_add.php",
	header: 'Add new product',
	afterCreate: function(win) {
		win.setWidth(700);
		win.setHeight(500);
	}
});

Add 'Close window' link to the footer

var win = Runner.displayPopup( {
	url: "products_add.php",
	header: 'Add new product',
	footer: '<a href="#" onclick="window.win.close();">Close window</a>',
	afterCreate: function(win) {
		window.win = win;
	}
});

Use of beforeClose() event

In this function you can return false to prevent window from being closed.
Do not allow to close window if 'Product Name' field is empty.

var win = Runner.displayPopup( {
	url: "products_add.php",
	header: 'Add new product',
	footer: '<a href="#" onclick="window.win.close();">Close window</a>',
	afterCreate: function(win) {
		window.win = win;
	},
	beforeClose: function(win) {
		if ($('iframe').contents().find("input#value_ProductName_1").val()=="")
			return false;
		else
			return true;
	}
});

Show 'View customer' button on each row of Orders List page

Insert a button into Orders List page grid.

Server code

$record = $button->getCurrentRecord();
$result["CustomerID"] = $record["CustomerID"];

ClientAfter code

var win = Runner.displayPopup( {
	url: "customers_view.php?editid1="+result["CustomerID"],
	width: 700,
	height: 500,
	header: 'View customer'
});

PHPRunner 9.6, ASPRunner.NET 9.6, ASPRunnerPro 9.6 released

$
0
0

PHPRunner 9.6, ASPRunnerPro 9.6, ASPRunner.NET 9.6 released (November 10th, 2016).

If you purchased or upgraded PHPRunner, ASPRunner.NET or ASPRunnerPro after November 10, 2015 this update is free of charge for you. Logon to control panel at https://xlinesoft.com/dss/support.asp and find download links and registration keys under 'My purchases'. If you do not have a help desk account yet create a new one using the same email address you have used to place the order.

Trial version download links

'Buy now' pages

PHPRunner

ASPRunner.NET

ASPRunnerPro

Upgrade pages

PHPRunner

ASPRunner.NET

ASPRunnerPro

Important: if you purchased PHPRunner, ASPRunnerPro or ASPRunner.NET before November 10th 2015 you have till November 20th, 2016 to use discounted upgrade option. After November 20th, 2016 you will have to purchase software at the full price. Do not miss your chance to upgrade for less.

'Update selected' feature

This is a long awaited feature that allows you quickly makes changes to multiple records. You can choose fields to appear on 'Update selected' dialog. Depending on Edit page settings 'Update selected' page can be shown either in popup or as a separate page.

Change fields order on the List page in run time

Drag-n-drop columns on the List page according to your needs. Your settings will be saved in the database and next time you open this page you will see the same layout.

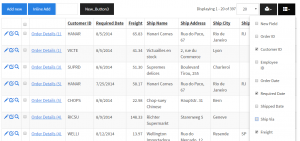
Show/hide columns on the List page in runtime

Choose what columns to show on each page in run time. Settings are also saved in the database and preserved between sessions. Each user has its own set of settings.

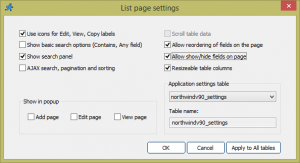
New List page settings

You can now select the table to store application settings like order of columns, show/hide state, columns size and also saved searches. These settings are user specific.


Version 9.7 of PHPRunner, ASPRunnerPro and ASPRunner.NET

$
0
0

Beta version of PHPRunner 9.7, ASPRunnerPro 9.7 and ASPRunner.NET 9.7 is here. Downloads links:

PHPRunner 9.7

ASPRunner.NET 9.7

ASPRunnerPro 9.7

Here is the list of new features in this update.

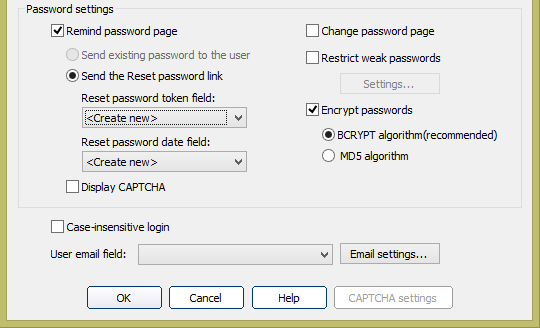
1. Improved password hashing

Option to use industry standard bcrypt hashing algorithm. Send password reset link to user's email, link expires in 24 hours.


2. Code snippets in dashboards

You can insert any sort of code snippet as dashboard element. This can be some code that displays current weather, calculates order totals, displays number of active users or even displays a Youtube video.

See this live demo for inspiration.

3. 'Sort by' dropdown control

When this option is useful:

  • Vertical or columns List page mode that previously didn't have sorting options
  • 'Sort by' control in mobile mode
  • Need to setup application specific sort modes

You can also choose if users still can sort data by clicking on column headers.

Here is how it looks in generated application.

4. Grid row/field click actions

This one is pretty cool, you can assign actions like open a certain page, make record selected, expand/collapse details or run a custom code to row/cell click.

Check this live demo.

Click CustomerID cell to open Orders view page in popup.

Click OrderID field to retrieve current order total and display it in OrderID field.

Code for this example:

Client Before event

// pass OrderID to Server event
params["OrderID"] = row.getFieldValue("OrderID");

Server event

// run SQL Query to retrieve order total
$result["total"] = DBLookup("select sum(Quantity*UnitPrice) from
`Order Details` where OrderID=".$params["OrderID"]);

Client After event

// change cell background
row.fieldCell("OrderID").css('background', 'yellow' );
// add order total to OrderID cell content
row.fieldCell("OrderID").html(
   row.fieldCell("OrderID").html()+"
Total: "+result["total"]);

5. New APIs

If you enjoy pushing your web applications beyond built-in functionality you going to love this update. We have added five new APIs in this version that will help you build modern applications. Here are some highlights and use cases. See full list of functions each API provides in updated manual.

Security API

Get username or user group of current user. Get or set OwnerID or permissions for any specific table. Verify username and password. Log user in automatically from your code. Check if user is logged in, if user is an admin, if user is a guest.

Labels/Titles API

Things like change project logo on the fly, modify table captions, modify breadcrumbs display format, modify field label or tooltip etc.

Tabs/Sections API

Make a tab active, enable/disable a tab, add a tab in runtime, change tab header or content, expand/collapse a section etc.

Search API

Lets you run a totally custom searches. For instance you have Order and OrderDetails tables setup as Master-Details. With the help of Search API you can display all orders that include a specific product in OrderDetails.

Ajax row click API

You can see an example of this API usage in previous code sample where we dynamically display order totals in OrderID column. You can change any field visual appearance or content using this API. Besides using it in 'Click action' event you can also access this API from any button added to the grid.

6. Improved appearance of cross-tab reports

Try scrolling down and right to see freezing columns and header.

Live demo

7. Form field placeholders

Placeholders are in-place tooltips that disappear as soon user starts typing something in that field.

Live demo

Enjoy!

Beta version of PHPRunner 9.8, ASPRunnerPro 9.8 and ASPRunner.NET 9.8 is here!

$
0
0

Beta version of PHPRunner 9.8, ASPRunnerPro 9.8 and ASPRunner.NET 9.8 is here!

Download links:
PHPRunner 9.8 beta
ASPRunner.NET 9.8 beta
ASPRunnerPro 9.8 beta

Beta is a trial version. You will be able to upgrade or purchase it as soon as stable version is released. Make sure you are subscribed to our newsletter and to change log to be notified every time new build is posted.

You can install beta version and run it side by side with previous versions of the software.

Here is the list of new features in version 9.8.

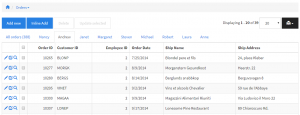
1. Tabs and additional WHERE on List page

This is how it looks in generated application

2. Export page in popup, export settings, choose fields and delimiter

3. Email templates. Customize any email sent from PHPRunner, ASPRunner.NET or ASPRunnerPro

4. Field events. Perform an action when cursor enters edit field or leaves it or mouse is over a field. Perform any sort of validation, make other fields hidden or required etc. Designed to work on Add, Edit and Register pages.

5. Two-factor authentication

6. SQL variables in SQL and Lookup wizards This is a very interesting feature that can be applied anywhere here SQL queries are in use. With variables like this you can write cleaner code and implement custom dropdown boxes or advanced security an easy way.  

Some examples: 

WHERE CustomerID= ':user.CustomerID'
WHERE CustomerID= ':session.UserID'

A full list of SQL variables: 

:field - current field value on Add, Edit or Register page
:master.field - any field from master record
:session.key - any session variable
:user.field - any field from login table
:old.field - old field value (before any changes were applied)
:new.field - new field value

Enjoy!

Creating Grid Tabs dynamically

$
0
0

Version 9.8 added an option to use Grid Tabs. Besides static tabs we also developed an API that allows to create and manage tabs from your code.

In this example we will use the typical Orders table to demonstrate how this API works. We will create a tab for each employee that lists her own orders only. This is how it is going to look in generated application.


This code needs to be added to List page: BeforeProcess event.

PHP

$sql = "select * from employees";
$rs = CustomQuery($sql);
while ($data = db_fetch_array($rs)) {

	$pageObject->addTab("EmployeeID='".$data["EmployeeID"]."'",
			$data["FirstName"], $data["EmployeeID"]);
}

C#

string sql = "select * from employees";
XVar rs = tDAL.CustomQuery(sql);
XVar data;
while (data = CommonFunctions.db_fetch_array(rs)) {
	pageObject.addTab("EmployeeID='"+data["EmployeeID"].ToString()+"'",
		data["FirstName"], data["EmployeeID"].ToString());
}

ASP

sql = "select * from employees"
set rs = CustomQuery(sql)
do while bValue(DoAssignment(data,db_fetch_array(rs)))
   pageObject.addTab "EmployeeID='" & data("EmployeeID") & "'", _
			data("FirstName"), data("EmployeeID")
loop

Using field events

$
0
0

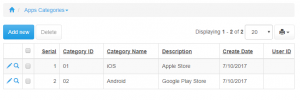
We have two tables: categories and sub_categories. CategoryID is a two-digit category code.


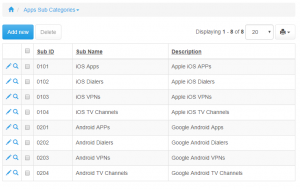
In sub_categories table SubID consists of two-digit category code and and two-digit subcategory code.

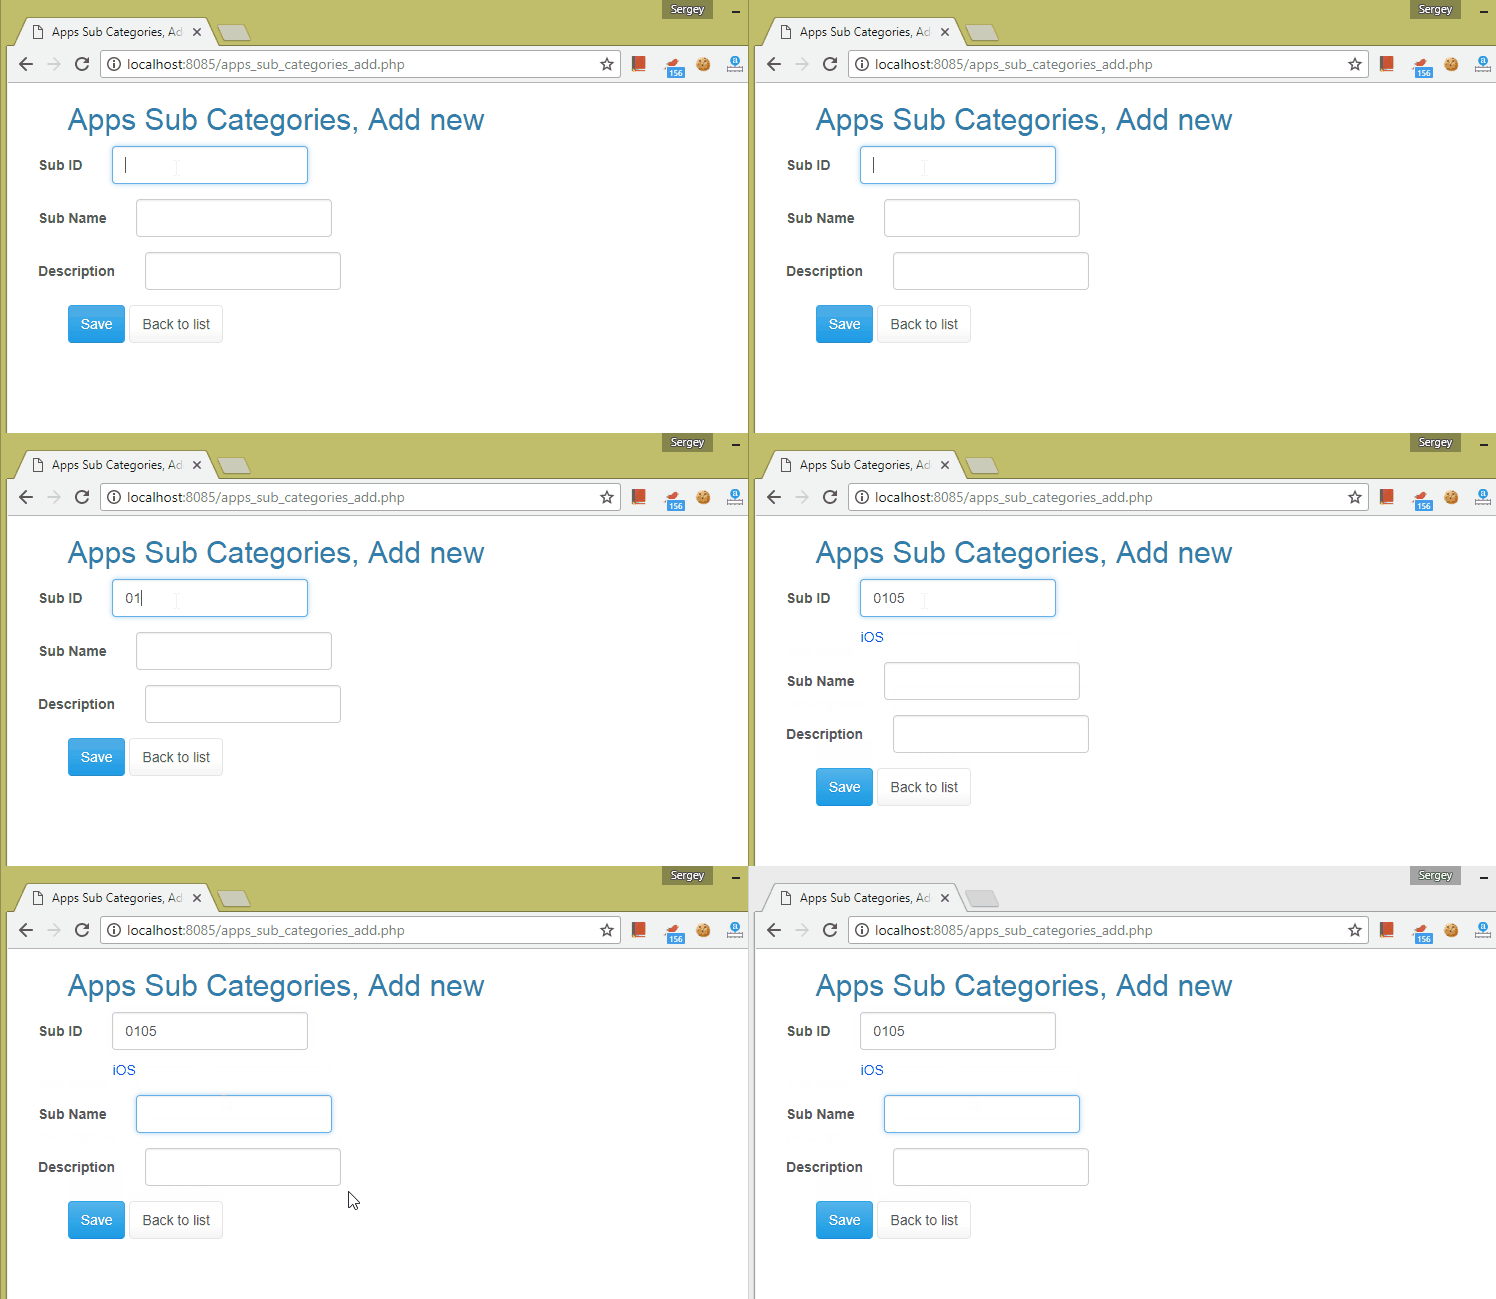
What we need to do is to simplify adding a large number of subcategories. When user types in first two digit (category) we want to show category name underneath and also calculate the next subcategory number. We will do that using field events.

This is how it works in generated application:

Code

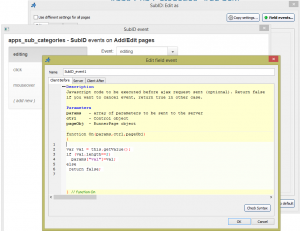
First we need to create Field Event for SubID field. We will use 'editing' event here which will be called every time the content of field is changed.

ClientBefore:

var val = this.getValue();
if (val.length==2)
  params["val"]=val;
else
 return false;

In ClientBefore code we check the length of entered code and only send it to server side when code is two digits long.

Server:

$result["catName"] = DBLookup("select CategoryName from apps_categories where CategoryID='".$params["val"]."'");
$sub = DBLookup("select max(substring(SubID,3,2))+1 from apps_sub_categories where left(SubID,2)='".$params["val"]."'");
$result["newCat"] = $params["val"].str_pad($sub,2,"0",STR_PAD_LEFT);

On Server side we pull CategoryName from categories table and also calculate next subcategory ID. We pass both category name and new subcategory code back to ClientAfter event.

ClientAfter:

$("#sub_tip").remove();
$("input[id=value_SubID_1]").after("
"+result["catName"]+"
"); ctrl.setValue(result["newCat"]);

In this event we remove previous tooltip with category name and add a new one. We also make it appear in blue color. Then we set the value of SubID with new subcategory code we received from the Server event.

Version 10. Page designer

$
0
0

It is about time we talk about version 10 of PHPRunner, ASPRunner.NET and ASPRunnerPro. We expect beta version to be available in November and stable version will be released before the end of the year.

Make sure that your software maintenance is current. Otherwise you will have to purchase version 10 at the full price.

The most interesting new feature in this update is Page Designer which will complement and eventually will replace the Visual Editor. This is quite a big change and before we talk about new functionality I need to explain why this change was required.


Visual Editor for many years was a primary way to customize the appearance of pages but we were hitting its limitations more and more often lately. We tried to introduce workarounds like Layout Editor and Free-Form mode but those were half measures.

  1. HTML is not a suitable medium for this job. When you mix HTML with your own template tags things tend to break.
  2. Visual Editor is powered by Internet Explorer editing engine which has minds on its own and doesn't always cooperate with us changing HTML behind the scene, shuffling HTML attributes etc.
  3. After switching to Bootstrap things like drag-n-drop in Visual Editor became even more difficult and we were often had to suggest make certain changes right in HTML code which sort of defeats the purpose of WYSIWYG.

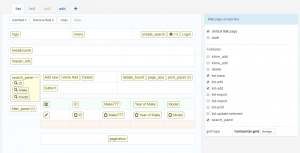
Page Designer is a grid-based design tool that is supposed to take care of above issues plus adds more functionality.

  1. Multiple pages of the same type i.e. two or three list pages based on the same table. Previously you had to create a custom view or two that were more difficult to manage and also created unnecessary pages.

    This will be useful in many scenarios. For instance you need to display a button on the list page but don't need to see it when the same list page is shown in dashboard. Or you need to design different list pages with different set of columns for different users. Now you can do this.

  2. Page drafts. You can consider them working page copies. If page is marked as a draft it won't appear in generated application. Using drafts you can quickly switch between two versions of the page.

    On a screenshot below you can see the default list page template (list), an additional list page layout (list1) and a draft (list2). It also shows you how easy you can add a field to grid and to search or to filter panel. No need to switch to another screen in the software to choose what fields will appear on each page.

  3. Cells and object properties. Made much easier in Page Designer to change visual properties of any cell, field or any other object.

  4. Grid types. You can switch between grid types keeping the rest of page intact.

  5. Controlling where buttons appear. Buttons can appear standalone or in dropdown. Here an example of moving 'Inline Add' and 'Delete' buttons to 'More' dropdown.

  6. Customizing mobile version behaviour. For any button, search or filter panel you can choose if will be shown in mobile mode or hidden in mobile mode or only visible when mobile menu is open. There also will be an option to create a separate page layout for mobile mode.
Viewing all 88 articles
Browse latest View live